Two more.....
Here are two more tags for the River City Stampers' May challenge using pink and green.
When I sat down to do these tags, I decided that I would use some materials I had not used in a long time, if ever. It's amazing what you can find in your stash. Lots of embellishments, lots of bling and lots of what-was-I-thinking-when-I-laid-out-good-money-for-this? items.
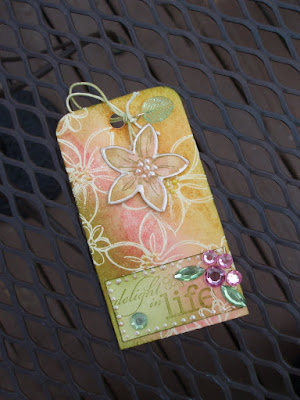
The first is made using the clear embossing technique as well as my oh-yes-I-meant-to-do-that technique.
You will need:
• Manilla tag
• Versamark embossing ink pad
• • Clear embossing powder
Cameo coral, Olive Green and More Mustard dye inks (Stampin'Up!®)
• Sponge
• Heat tool
• Flower and sentiment stamps
• Pink and green rhinestones
• Flower punch (Stampin'Up!®)
• Viva Décor Pearl Pen, Cream
• Leaf charm
• Beacon 3-in-1 adhesive
Directions:
1. Stamp and emboss flowers randomly on tag but not on lower edge. Sponge all three ink colors over top of embossing on entire tag and wipe with a paper towel to reveal embossed flowers. Stamp sentiment on lower portion of tag. Here's where you use my oh-yes-I-meant-to-do-that technique: I stamped my sentiment very crooked. Usually I don't mind that because it adds interest, but this wasn't one of those times. I cut off the bottom portion of the tag, lined it up on the paper trimmer and cut it so that it would be straight, then inked the edges a little more and glued it in place.
Tip: If you have a sentiment stamp that is mounted incorrectly, heat it in the microwave for about 10 seconds, then use dental floss to slice it off the wood and reposition it. Repeat if necessary. I usually draw a line with a Sharpie parallel to the wooden edge on the mounting side of the stamp, then line up the sentiment on that.
2. Stamp and punch the flower-shaped tag.
3. Use Pearl Pen to add tiny dots around the edge of the sentiment tag, to the centers of all the flowers and around the edge of the flower-shaped tag. Allow Pearl Pen to dry.
4. Punch an additional flower from printed card stock scrap. Glue tag string between flower with Pearl Pen edging and printed card stock. Thread leaf charm onto string and re-tie through tag hole using a slip knot.
5. Add rhinestone embellishments as desired.
The second tag is very tiny, about 1 1/2" X 3". I had received these flower buckles from my secret Stamp club pal about five years ago and had never used any of them. What a nice surprise it was to find them in the bottom of my embellishment stash!

I used:
• Small manilla tag
• Green polka dot ribbon, 8"
• Pink striped ribbon, 11"
• Metal flower buckle
• Viva Décor Pearl Pen, Lilac
• Cameo coral, Olive Green and More Mustard dye inks (Stampin'Up!®)
• Sponge
• Beacon 3-in-1 adhesive
Directions:
1. Sponge tag using all three inks, overlapping edges to blend.
2. Adhere pink striped ribbon to tag front.
3. Thread green ribbon through flower buckle. Center flower buckle on tag top, bring both ends of ribbon around to the back and insert them in the tag hole. Pull up and tie behind buckle.
4. Fold remaining pink ribbon in half and adhere between buckle and tag.
5. Write "love" with Lilac Pearl Pen.
These are ready for any use you like. I think both of these will be come gift tags for me.
Check back tomorrow for the last two tags, which are my favorites!
Now, go hug someone you love and thank God for Spring! (I just love typos when they make sense, although my phone provider is AT&T. I actually typed, Thank God for Sprint!)
I received product from Viva Décor, which I would have purchased anyway, because I love all their products!
When I sat down to do these tags, I decided that I would use some materials I had not used in a long time, if ever. It's amazing what you can find in your stash. Lots of embellishments, lots of bling and lots of what-was-I-thinking-when-I-laid-out-good-money-for-this? items.
The first is made using the clear embossing technique as well as my oh-yes-I-meant-to-do-that technique.

You will need:
• Manilla tag
• Versamark embossing ink pad
• • Clear embossing powder
Cameo coral, Olive Green and More Mustard dye inks (Stampin'Up!®)
• Sponge
• Heat tool
• Flower and sentiment stamps
• Pink and green rhinestones
• Flower punch (Stampin'Up!®)
• Viva Décor Pearl Pen, Cream
• Leaf charm
• Beacon 3-in-1 adhesive
Directions:
1. Stamp and emboss flowers randomly on tag but not on lower edge. Sponge all three ink colors over top of embossing on entire tag and wipe with a paper towel to reveal embossed flowers. Stamp sentiment on lower portion of tag. Here's where you use my oh-yes-I-meant-to-do-that technique: I stamped my sentiment very crooked. Usually I don't mind that because it adds interest, but this wasn't one of those times. I cut off the bottom portion of the tag, lined it up on the paper trimmer and cut it so that it would be straight, then inked the edges a little more and glued it in place.
Tip: If you have a sentiment stamp that is mounted incorrectly, heat it in the microwave for about 10 seconds, then use dental floss to slice it off the wood and reposition it. Repeat if necessary. I usually draw a line with a Sharpie parallel to the wooden edge on the mounting side of the stamp, then line up the sentiment on that.
2. Stamp and punch the flower-shaped tag.
3. Use Pearl Pen to add tiny dots around the edge of the sentiment tag, to the centers of all the flowers and around the edge of the flower-shaped tag. Allow Pearl Pen to dry.
4. Punch an additional flower from printed card stock scrap. Glue tag string between flower with Pearl Pen edging and printed card stock. Thread leaf charm onto string and re-tie through tag hole using a slip knot.
5. Add rhinestone embellishments as desired.
The second tag is very tiny, about 1 1/2" X 3". I had received these flower buckles from my secret Stamp club pal about five years ago and had never used any of them. What a nice surprise it was to find them in the bottom of my embellishment stash!

I used:
• Small manilla tag
• Green polka dot ribbon, 8"
• Pink striped ribbon, 11"
• Metal flower buckle
• Viva Décor Pearl Pen, Lilac
• Cameo coral, Olive Green and More Mustard dye inks (Stampin'Up!®)
• Sponge
• Beacon 3-in-1 adhesive
Directions:
1. Sponge tag using all three inks, overlapping edges to blend.
2. Adhere pink striped ribbon to tag front.
3. Thread green ribbon through flower buckle. Center flower buckle on tag top, bring both ends of ribbon around to the back and insert them in the tag hole. Pull up and tie behind buckle.
4. Fold remaining pink ribbon in half and adhere between buckle and tag.
5. Write "love" with Lilac Pearl Pen.
These are ready for any use you like. I think both of these will be come gift tags for me.
Check back tomorrow for the last two tags, which are my favorites!
Now, go hug someone you love and thank God for Spring! (I just love typos when they make sense, although my phone provider is AT&T. I actually typed, Thank God for Sprint!)
I received product from Viva Décor, which I would have purchased anyway, because I love all their products!


Comments