Who'd a thunk it?
My post today is a project that is the first of what I call, Using Up My Stash. I've had this cute book box for some time, but it was in a plastic bin (the clear kind so you can see what you have). Of course, it was packed so full and stacked on the top shelf of my storage area that I never saw this box until one day when I needed something else and didn't want to drive to Memphis to get it.
 The Who'd a thunk it? title for this post is because I discovered something really cool about the Duetica Lettering Arts Studio. Now, you know how I love Duetica. I have posted a lot of projects using their fabulous lettering system, all (or most) with pretty detailed instructions for making even more changes once the type is set. I usually use either Photoshop or Illustrator, select the area I want to edit, and just drop in my color of choice. AND I had noticed the the outline option in the Duetica software. It just never occurred to me to actually use it, cut out the letters and color them to match my project. I've been digital for so long that the old tried and true ways have almost disappeared from my vocabulary.
I've been wanting to make a chronicle about my life. Most of you who know me well know that I am a firm believer of preserving memories. If you don't preserve them, who will, right? When I found this box, I knew exactly what I wanted to do and here's how I did it:.
Note: Every edge on my book and pages was sponged with ColorBox Chestnut Roan Chalk Ink, which I absolutely love.
Supplies
Book Box (Hobby Lobby)
HP Presentation Paper, 32#
Ink Jet Printer
Colorbox Chalk Ink, Chestnut Roan
Photoshop Software
Cream Card Stock
Golden Acrylic Paint, Copper
Graphic 45 Card Stock, assorted prints
Spectrum Noir Markers
Pop Dots
3M Super 77 Spray Adhesive
Nameplate
Viva Décor Pearl Pen, Bronze
Swirl Stamp
Zutter Bind-it-all and binding rings
Directions
1. I first set my type using Duetica's Tin Whistle font. I saved it twice, once with colored letters and once as an outline.
2. In Photoshop, I pulled up a scan of one of my abstract paintings, Delta Afternoon. Measuring the front, back and side of the box, I created three files and dropped the painting into the open spaces on each. On the spine portion, I set the colored title into the painting. They were printed out on HP 32# Presentation Paper, which is a little heavier than copier paper, but not as thick as card stock and it has a really creamy finish.
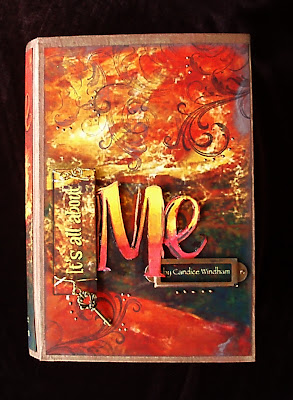
3. For the front cover, I printed out the painting and then printed Me as a black outline on cream colored card stock and It's all about on a separate file with the painting in the background. I painted the exposed edges of the book with Golden Copper acrylic paint. Graphic 45 striped card stock was used on the page edges to simulate sheets. The inside was lined with Graphic 45 card stock. Before adding the printed painting to the covers, I stamped swirls using the Chestnut Roan ink. Super 77 was used to adhere all cover and liner card stock.
4. I cut two pieces of chipboard and mounted the It's all about tag on it, then trimmed and inked the edges. A couple of twists of copper wire and a tiny key complete the tag. I attached it with pop dots.
5. I colored the Me with Spectrum Noir markers and fussy-cut it, then mounted the pieces onto large pop dots and adhered them to the book box front. I added my name to the front, then framed it with the nameplate. Bronze Pearl Pen added to the nameplate holes give the illusion of brads. Bronze Pearl Pen dots were added randomly to the cover for texture.
NOTE: If you need a slimmer pop dot, just fold the excess paper from the roll over the dot and trim it to fit. Keep the excess for another project.
6. I assembled my book pages, which are several different sizes, mostly from scrap card stock, glassine and paper envelopes and heavy paper coasters. They were bound with the Zutter Bind-it-all.
This is a work in progress. I will add to it as I come across photos or think of stories to include. Hopefully, this will give my descendants a glimpse into the person I am and how I became that way.
I hope you will take the time to record some things about yourself. You don't have to have a book. Just a decorated box with individual notes or photos contained would be a treasure for your grandchildren to find some day.
Now, go write a little snippet about yourself, then hug someone you love.
Note: I received software from Duetica Lettering Arts Studio, Pearl pens from Viva Décor and ink from Clearsnap.
 The Who'd a thunk it? title for this post is because I discovered something really cool about the Duetica Lettering Arts Studio. Now, you know how I love Duetica. I have posted a lot of projects using their fabulous lettering system, all (or most) with pretty detailed instructions for making even more changes once the type is set. I usually use either Photoshop or Illustrator, select the area I want to edit, and just drop in my color of choice. AND I had noticed the the outline option in the Duetica software. It just never occurred to me to actually use it, cut out the letters and color them to match my project. I've been digital for so long that the old tried and true ways have almost disappeared from my vocabulary.
I've been wanting to make a chronicle about my life. Most of you who know me well know that I am a firm believer of preserving memories. If you don't preserve them, who will, right? When I found this box, I knew exactly what I wanted to do and here's how I did it:.
Note: Every edge on my book and pages was sponged with ColorBox Chestnut Roan Chalk Ink, which I absolutely love.
 |
| Box inside |
Book Box (Hobby Lobby)
HP Presentation Paper, 32#
Ink Jet Printer
Colorbox Chalk Ink, Chestnut Roan
Photoshop Software
Cream Card Stock
Golden Acrylic Paint, Copper
Graphic 45 Card Stock, assorted prints
Spectrum Noir Markers
Pop Dots
3M Super 77 Spray Adhesive
Nameplate
Viva Décor Pearl Pen, Bronze
Swirl Stamp
Zutter Bind-it-all and binding rings
Directions
1. I first set my type using Duetica's Tin Whistle font. I saved it twice, once with colored letters and once as an outline.
2. In Photoshop, I pulled up a scan of one of my abstract paintings, Delta Afternoon. Measuring the front, back and side of the box, I created three files and dropped the painting into the open spaces on each. On the spine portion, I set the colored title into the painting. They were printed out on HP 32# Presentation Paper, which is a little heavier than copier paper, but not as thick as card stock and it has a really creamy finish.
3. For the front cover, I printed out the painting and then printed Me as a black outline on cream colored card stock and It's all about on a separate file with the painting in the background. I painted the exposed edges of the book with Golden Copper acrylic paint. Graphic 45 striped card stock was used on the page edges to simulate sheets. The inside was lined with Graphic 45 card stock. Before adding the printed painting to the covers, I stamped swirls using the Chestnut Roan ink. Super 77 was used to adhere all cover and liner card stock.
 |
| Pop dots bring the title forward. |
5. I colored the Me with Spectrum Noir markers and fussy-cut it, then mounted the pieces onto large pop dots and adhered them to the book box front. I added my name to the front, then framed it with the nameplate. Bronze Pearl Pen added to the nameplate holes give the illusion of brads. Bronze Pearl Pen dots were added randomly to the cover for texture.
 |
| Close up of inner book cover. |
NOTE: If you need a slimmer pop dot, just fold the excess paper from the roll over the dot and trim it to fit. Keep the excess for another project.
6. I assembled my book pages, which are several different sizes, mostly from scrap card stock, glassine and paper envelopes and heavy paper coasters. They were bound with the Zutter Bind-it-all.
This is a work in progress. I will add to it as I come across photos or think of stories to include. Hopefully, this will give my descendants a glimpse into the person I am and how I became that way.
I hope you will take the time to record some things about yourself. You don't have to have a book. Just a decorated box with individual notes or photos contained would be a treasure for your grandchildren to find some day.
Now, go write a little snippet about yourself, then hug someone you love.
 |
| First inside page of inner book |
 |
| Second page of inner book. |
Note: I received software from Duetica Lettering Arts Studio, Pearl pens from Viva Décor and ink from Clearsnap.


Comments